About the creator
How to Install LED Strip Lights Around Corners?
LED strip lights are renowned for their flexibility, but installing them around corners can be a challenge. Can you fold or bend the strips without damaging them? Is there a way to mount them on corners for even lighting? In this article, we will explore different methods to install Led strip lights around corners and provide step-by-step instructions.
Discover 5 Effective Ways to Install LED Strips Around Corners
Let’s dive into the five best methods for mounting LED strips around corners:
Method #1: The Corner Fold or 90-degree Fold
The corner fold, also known as the 90-degree fold, offers a professional approach to installing LED strips in corners. It requires no additional tools or cutting, making it ideal for beginners. Here’s how it’s done:
Find the point where you want to create an angular shape to fit the corner.Bend the strip back in the opposite direction to a 45-degree angle.Fold it back to create a 90-degree angle and firmly press it down.Use super glue to hold the fold in place.
Pros: Creates precise 90-degree angles, no extra tools needed, ensures uniform lighting around corners.
Cons: Can’t fold if there is an LED in the corner, not ideal for waterproof LED strips, can lead to short circuits.
Method #2: 90-Degree Pitch or the Ribbon Bend
The ribbon bending technique, also known as 90-degree pitch, is an easier method for beginners. It doesn’t affect the lighting quality and is suitable for spaces where the strips are not visible. Here’s how it’s done:
Place the LED strip on a plain surface.Target the place where you want to bend and twist the strip in a looping style.Curl it tightly to change the direction.Use super glue or adhesive tape to join the loop to the surface.
Pros: Easy to bend, no tools required, ideal for spaces where strips are not visible.
Cons: May not give a finished look, can break the waterproof coating if twisted tightly, may damage the LED if it sits within the fold.
Method #3: Accordion Folds (The Curve)
The accordion fold method is ideal for round corners or angles greater than 90 degrees. It allows you to create gradual curves in your strip lights. Here’s how it’s done:
Make small accordion folds spaced out by several inches.Use glue or adhesive to set each fold to define the curve.
Pros: Great for round corners, no special connector required, can create artistic lighting patterns.
Cons: Hard to bend, not beginner-friendly, high risk of LED damage, time-consuming process, not suitable for precise angling.
Method #4: Use L-Shape Connector
L-shape connectors, also known as back-to-back connectors, provide a neater corner lighting solution. These small solderless connectors ensure a smooth and even lighting effect. Here’s how to use them:
Purchase L-shape connectors.Find the point where you need to angle the LED strip to fit the corner.Make a cut at that point to divide the LED strip into two pieces.Connect both ends of the jump connector to the two pieces of LED strips.Lock both sides in place.
Pros: Gives a smooth and even lighting effect, easy to use and secure, waterproofing remains intact, effective for creating 90-degree angles.
Cons: Additional cost to purchase connectors, risk of wrong cuts, not ideal for round edges, connectors can become loose.
Note: For more flexibility, consider using L-wire connectors for bending around round edges.
Method #5: The Cut-and-Jump
If your LED strips are not bendable, jump connectors are the ultimate solution for installing strips around corners. These flexible connectors can bend in any direction and are easily available. Here’s how to connect them:
Purchase LED strip jump connectors.Cut the LED strip at the point where it needs to bend.Connect both ends of the jump connector to the two pieces of LED strips.Do soldering if required.
Pros: Ideal for unbendable LED strips, flexible to move in any direction, works well on irregular corners or edges, saves installation time.
Cons: Need additional tools, soldering may be required in some cases, may not be suitable for beginners.
Method #6: Use Pre-Bend LED Strips
If you prefer not to manually bend the LED strips, pre-bend LED strips are available in various shapes such as L-shaped, U-shaped, J-shaped, or S-shaped. Installing these strips is as simple as peeling off the adhesive backing and sticking them to the corners.
Pros: Easy to install, no risk of breaking, come in a variety of shapes and sizes.
Read more: Led Lights BLLS
Cons: More expensive than regular LED strips.
Steps to Install LED Strip Lights Around Corners
Here’s a step-by-step guide to installing LED strip lights around corners:
Step 1: Take Measurements
Measure the length of LED strips you need for lighting.Purchase LED strips based on the required length, and consider buying extra meters.Place the strips in the desired installation location, including corners, and identify where you need to bend them.
Step 2: Decide the Bend Type
Choose which bending method you want to use based on the techniques mentioned above.If you have LED strip connectors, use them for the best results.
Step 3: Collect Required Materials
If you’re using connectors, gather LED strips, LED strip connectors, and a sharp scissor.If you’re folding the strips, you only need super glue or adhesive tape to hold the folds.
Step 4: Clean the Surface
Prepare the surface of installation by wiping it with a wet cloth or rubbing alcohol.Remove any dust or dirt from the surface and ensure it’s dry before mounting the LED strips.
Step 5: Prepare the LED Strip to Fit Around the Corners
Fold the LED strip according to your chosen method, using super glue or adhesive tape to secure the folds.If using connectors, cut the LED strip at the bending point and connect both ends with the connector, locking them tightly.
Step 6: Installation – Removing the Adhesive Backing
Peel off the adhesive backing of the LED strip and firmly mount it to the corners.Press it down to ensure it sticks securely to the surface, and consider using clips for additional support if needed.Refer to the article “Installing LED Flex Strips: Mounting Techniques” for more LED strip mounting tips.
Step 7: Power Up
Connect the LED strip to an LED driver if you have low-voltage LED strips to control the current flow and prevent overheating.
How to Connect Two Separate Light Strips at a Corner?
If you need to cut and reconnect LED strips to achieve a 90-degree or wider angle, you have three methods to choose from:
Using a corner connector: These L-shaped connectors are excellent for corners with 90-degree angles. Cut the LED strips at the bending point, connect both parts with the corner connector, and lock them in place.
Soldering the light strips: Soldering offers a professional and permanent solution for connecting LED strips. Pre-tin and heat the soldering pad of one LED strip, then place the other non-tinned strip over it and heat until the solder melts and flows.
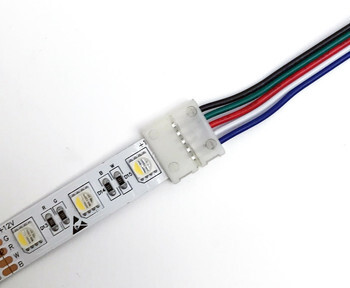
Using a cable connector: Cable connectors complete the electric circuit, connecting two LED strips and making them glow. Choose the appropriate connector based on PIN numbers, IP rating, and PCB width of your LED strips.
For more details on connecting LED strips and choosing the right connectors, refer to the article “Can You Cut LED Strip Lights and How to Connect: Full Guide.”
Tips for Mounting LED Strip Lights Around Corners
Consider the following tips to ensure a successful installation of LED strip lights around corners:
Use super glue or adhesive to keep the folds in shape when bending LED strips.
Choose LED strip connectors over the folding method for a more secure connection and to prevent damage.
Select connectors with the correct PCB width and PIN numbers to ensure compatibility.
Avoid bending waterproof LED strips to prevent damage to the coating.
Cut the LED strips precisely along the marked cut lines to maintain circuit integrity.
Pay attention to polarity when connecting LED strips to ensure proper functioning.
When using RGB LED strips, ensure the letters line up correctly.
By following these tips and methods, you can confidently install LED strip lights around corners and achieve a professional and aesthetically pleasing lighting effect.
The Bottom Line
LED strip lights offer flexibility and versatility for corner lighting. Whether you choose to fold, bend, or use connectors, LEDYi provides various options to suit your specific needs. From single-color to RGB or tunable LED strip lights, they offer connectors, corner connectors, and cable connectors to ensure a secure and reliable connection. Explore their range of products and find the perfect solution for your corner lighting projects.
FAQs
Q1: What are the best types of LED strip lights for corner installations?
A1: Flexible LED strip lights with a high level of flexibility and adhesive backing are typically the best choice for corners. Look for options designed specifically for bending and curving.
Q2: Can I bend LED strip lights around sharp corners?
A2: LED strip lights are designed to be flexible, but bending them around extremely sharp corners may damage the strip or affect the lighting quality. It’s best to use corner connectors or cut and reconnect the strips at the corner.
Q3: How do I install LED strip lights around a 90-degree corner?
A3: To install LED strip lights around a 90-degree corner, you can either use corner connectors designed for LED strips or cut the strip at the corner, leaving a small gap, and then reconnect the two segments.
Q4: Are there special connectors for LED strips at corners?
A4: Yes, there are corner connectors or L-shaped connectors available for LED strips. These connectors allow you to make a seamless turn at a corner without cutting the strip.
Q5: Can I solder LED strip lights at corners?
A5: Yes, soldering is an option for making connections at corners. You can cut the strip at the corner, solder wires to connect the segments, and insulate the soldered area to ensure proper conductivity and safety.
Q6: How do I ensure a smooth and even light distribution around corners?
A6: To achieve even lighting around corners, make sure the LED strips are securely adhered to the surface, and any gaps or overlaps are minimized. Proper spacing and alignment are key to maintaining consistent lighting.
Q7: Do I need additional power sources for corners in longer LED strip installations?
A7: In longer installations, it’s essential to provide sufficient power to maintain brightness and color consistency around corners. You may need to use power amplifiers or additional power supplies strategically placed along the length of the strip.
Q8: Are there waterproof LED strip options for outdoor corner installations?
A8: Yes, there are waterproof and weather-resistant LED strip options designed for outdoor use. These strips are protected against moisture and can be used in outdoor corner installations.
Q9: Can I install LED strip lights in a zigzag pattern around corners?
A9: Yes, you can create zigzag patterns around corners by cutting and connecting LED strips in a staggered fashion. This can add a unique visual effect to your installation.
Q10: What safety precautions should I take when installing LED strip lights around corners?
A10: Ensure that the power is turned off while working with LED strip lights, follow the manufacturer’s guidelines, and use appropriate connectors, adhesives, and tools. If soldering, take necessary precautions to avoid burns and use soldering safety gear.
No posts
Subscription levels
No subscription levels