Trizz figure craft log
I've finally finished the Trizz figure! It took me a little over a month to make, because I had to wait for some materials and in general I was distracted by other things. This is my very first figure in principle and I think the result is pretty good, though far from perfect. Next I will bring you the craft log and tell you how it all went, I hope you will find it interesting, enjoy your reading!
It started with the body. What I noted for myself is that it is still desirable to make a sketch of the final work before starting, it will help to better understand the proportions and construction of the skeleton. Here I acted in an experimental way, through trial and error, so the work was largely based on improvisation. Inside, I didn't make a skeleton, I first molded the body, baked it, drilled holes, and inserted pieces of wire as connectors for the limbs, head, and tail.

Head. Actually, it's worth saying I don't have an oven. Like, at all, it's broken. How did I do the baking? I read on the Internet that you can do the processing by boiling the parts. I tried it and it worked quite well! However, this method has a lot of side effects, which I will talk about later. For the head, I molded a simple shape, baked it, and then glued on additional volume and details. The work was made of polymer clay and I got a very dry piece. You can see on the photo the roughness and irregularities - this is how the dry clay crumbled when I tried to smooth it out.
I also didn't have any tools for molding, you can see a toothpick in the background - that's what I worked with

Limbs. This is where the problems with the brew method come into play. You can see how much the joint between the body and the arm is bunching up. I originally caulked it pretty neatly, but in the cooking process, the edges started to bunch up. Also, when I build up extra volume - water gets into the joints and the seams start to separate. It's just not possible to join the pieces together using this method and it became a problem. Also you can see how sloppy the detailing of the folds on the pants is - the problem here is the dryness of the clay, it is not very plastic.
I originally planned to make a prosthetic shoulder of Trizz by molding it out of clay, but in the process I got the idea to make it out of wire. On the photo below is the first version, so to say prototype. It is gaunt, but already looks nice. The second arm was already baked by then, so I just took a knife and cut off the shoulder to replace it with wire
I originally planned to make a prosthetic shoulder of Trizz by molding it out of clay, but in the process I got the idea to make it out of wire. On the photo below is the first version, so to say prototype. It is gaunt, but already looks nice. The second arm was already baked by then, so I just took a knife and cut off the shoulder to replace it with wire

Wire glasses^^

I added the curls, by this point the clay softener and glue had already arrived. The second one couldn't help me without an oven, but I needed it later, but the first one made my work much easier
I also made a neater prosthesis!
I also made a neater prosthesis!

I also added a tail and molded the pants and feet.

The finished sculpt. I cleaned up all the irregularities with sandpaper, added clothes and small details, glued the parts together. With this I was helped by a special glue and my grandmother's oven, I had to come over for a visit hehe
Moment before painting begins
Moment before painting begins


Painted it with acrylic paints. It took longer than I expected, but seems like a good outcome!
At first I wanted to make the fill with one beige color, like paper and then designate the light shade, to do it like my traditional art style. But in the process I thought that it looks boring and I made it multicolored, but also tried to dabble with the designation of shadows and highlights.


Next I had to varnish the figure. This is where a new problem arose, because acrylic varnish is not suitable for polymer clay. I have already tried it earlier on a small bead that I made myself. As a result - dust and hair stuck on it, the varnish does not dry at all. Suitable varnishes for such clay - either specialized or furniture varnishes, water-based, without alcohol. I just had a hole in the budget, no money at all, and these varnishes are not the cheapest. So I decided to make the best of it. I have epoxy resin, I bought it a long time ago, also for creative experiments and decided to try to perform varnishing with it

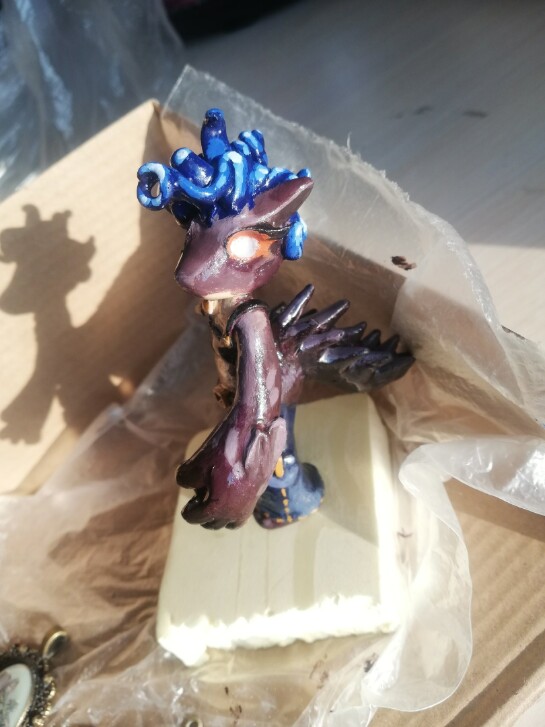
The figurine has become very colorful. It is insanely shiny, creating the illusion that it is made of glass and I like it very much. But it's not without its challenges.

As I feared, the resin slowly dripped down during the curing process, so the layer was uneven, with barely noticeable drips, in some places on the sharp edges it was so thin that it seems to have completely dripped off. I'm not sure how to fix this yet, I'm thinking of covering it with a second coat of resin to cover the places where it dripped from

Despite the difficulties, it was an interesting experience and the result looks better than I expected, considering that I had never modeled before, especially with polymer clay and was dealing with the materials for the first time

All that's left to do is fix the glasses, apply a second coat of varnish and make the stand and all set!

Charlie will be next...
